Microservices and Docker with .Net Core and Azure Service Fabric - Part four
I recently made some refactor/enhancements, take a look at the ChangeLog to view the details. TL;DR: upgrades to .Net Core 3.1, Kubernetes support, add a new notifications service, Health checks implementation.
In the last post, we had the opportunity to made real our Microservices architecture and everything that we’ve talked about in these series of posts about this interesting topic, we implemented a solution using DDD, CQRS and Event Sourcing with the help of .Net Core, RabbitMQ, Dapper, Polly, etc. We also analyzed the key points in our code in order to understand how all pieces work together and lastly, we took a look at Docker configuration and how it works in our local environment. In this last post, we’re going to talk about how to deploy our solution in a production environment using Azure Service Fabric as a microservices orchestrator and using other resources on the cloud, like Azure Service Bus, Sql Databases, and CosmosDB.
You’re going to need a Microsoft Azure account, if you don’t have one, you can get it joining to Visual Studio Dev Essentials program.
Deploying Cloud Resources
The first step is to deploy our resources on Microsoft Azure, in order to have a proper and powerful production environment, in our case, the Service Bus, the Invoice and Web Site SQL databases, the Trip MongoDB and of course the Service Fabric cluster. So, for simplicity, we’re going to use Azure CLI 2.0 to run pre-configured scripts and deploy these resources on Microsoft Azure. The first thing is to log in with Azure CLI, the easiest way is using the interactive log-in through the az login command. After we’re logged in successfully, we can run the deployment scripts, which are located in the deploy folder.
In order to execute the following scripts you need to open a command window, pointing to the deploy folder. I also recommend that you create a Resource Group to group all these resources that we’re going to create. For example, I created a resource called duber-rs-group, which is the one that I used to create the service bus, databases, etc. If you don’t want to do that, you should specify the resource location and the script automatically will create the resource group as well: create-resources.cmd servicebus\sbusdeploy duber-rs-group -c westus
Service Bus
Basically, this script creates a Service Bus namespace, a Service Bus topic and three Service Bus subscriptions to that topic (Trip, Invoice, and WebSite). You can create it from Azure Portal if you prefer and you can also modify the script as you need it.
create-resources.cmd servicebus\sbusdeploy duber-rs-group
SQL Databases
This script creates one SQL Server and two databases (InvoiceDb and WebSiteDb). Additionally, it creates firewall rules to allow to connect from your database client from any IP. (This is just for simplicity, but for a real production environment you might not want to do that, instead, you should create specific rules for specific IPs). You can create it from Azure Portal if you prefer and you can also modify the script as you need it.
create-resources.cmd sql\sqldeploy duber-rs-group
Cosmos Database
This script just creates the MongoDB which is used by Trip microservice. You can create it from Azure Portal if you prefer and you can also modify the script as you need it.
create-resources.cmd cosmos\deploycosmos duber-rs-group
Building and publishing Docker Images
The next step is to build and publish the images to a Docker Registry, in this case, we’re going to use the public one, but if you have to keep your images private you can use a private registry on Docker or even in Azure Container Registry. So, a registry is basically a place where you store and distribute your Docker images.
Unlike the development environment where we were using an image for every component (SQL Server, RabbitMQ, MongoDB, WebSite, Payment Api, Trip Api and Invoice Api, in total 7 images), in our production environment we are only going to have 2 images, which are going to be our microservices, the Trip and Invoice API’s which in the end are going to be deployed in every node in our Service Fabric cluster.
First of all, we need to have in mind that there are several images that we’re using to build our own images, either for develop or production environments. So, for Asp.Net Core applications, Microsoft has mainly two different images, aspnetcore and aspnetcore-build, the main difference is that the first one is optimized for production environments since it only has the runtime, while the other one contains the .Net Core SDK, Nuget Package client, Node.js, Bower and Gulp, so, for obvious reasons, the second one is much larger than the first one. Having said that, in a development environment the size of the image doesn’t matter, but in production environment, when the cluster is going to be constantly creating instances dynamically to scale up, we need the size of the image to be small enough in order to improve the network performance when the Docker host is pulling the image down from Docker registry, also the docker host shouldn’t spend time restoring packages and compiling at runtime, it’s the opposite, it should be ready to run the container and that’s it. Fortunately, Visual Studio takes care of that for us, let’s going to understand the DockerFile.
FROM microsoft/aspnetcore:2.0 AS base
WORKDIR /app
EXPOSE 80

FROM microsoft/aspnetcore-build:2.0 AS build
WORKDIR /src
COPY microservices-netcore-docker-servicefabric.sln ./
COPY src/Application/Duber.Trip.API/Duber.Trip.API.csproj src/Application/Duber.Trip.API/
RUN dotnet restore -nowarn:msb3202,nu1503
COPY . .
WORKDIR /src/src/Application/Duber.Trip.API
RUN dotnet build -c Release -o /app

FROM build AS publish
RUN dotnet publish -c Release -o /app

FROM base AS final
WORKDIR /app
COPY --from=publish /app .
ENTRYPOINT ["dotnet", "Duber.Trip.API.dll"]
Visual Studio uses a Docker Multi-Stage build which is the easiest and recommended way to build an optimized image avoiding to create intermediate images and reducing the complexity significantly. So, every FROM is a stage of the build and each FROM can use a different base image. In this example, we have four stages, the first one pulls down the microsoft/aspnetcore:2.0 image, the second one, performs the packages restore and build the solution, the third one, publish the artifacts and the final stage, it’s actually the one that builds the image, the important thing here, is that it’s using the base stage as the base image, which is actually the optimized one, and it’s taking the binaries (compiled artifacts) from publish stage.
So, before building the images, we need to set the environment variables that we’re using in a proper way, in the docker-compose.override.yml file, These variables are mainly our connection strings for the cloud resources which we already deployed. To do that we need to set them in a file called .env.
APP_ENVIRONMENT=Production
SERVICE_BUS_ENABLED=True
AZURE_INVOICE_DB=Your connection string
AZURE_SERVICE_BUS=Your connection string
PAYMENT_SERVICE_URL=Your Url
AZURE_TRIP_DB=Your connection string
AZURE_WEBSITE_DB=Your connection string
TRIP_SERVICE_BASE_URL=Your Url
TRIP_SERVICE_BASE_URL should be the Service Fabric Cluster Url + the Port which we are using for Trip API, we’re going to explain it later.
After we set these variables correctly, we can build the images, we can do that through the docker-compose up command, or we can let Visual Studio do the work for us just building the solution in release mode. The main difference when you build your Docker project in release or debug mode, is that in release mode, the application build output is copied to the docker image
from obj/Docker/publish/ folder, but in debug mode, the build output is not copied to the image, instead, a volume mount is created to the application project folder, and another one which contains debugging tools, that’s why we can debug the Docker Containers in our local environment, and that’s why we need to share the disk with Docker, because the docker container needs direct access to the project folder on your local disk in order to enable debugging.
Now that we already know the key points about Docker images and how Visual Studio manages them, we’re going to deploy them to Docker Registry. So, the first step is tagging the image, for example, you can tag your image with the current version or whatever you want, in our case, I’m going to tag them with prod, to indicate they are the images for our production environment.
docker tag duber/trip.api vany0114/duber.trip.api:prod
docker tag duber/invoice.api vany0114/duber.invoice.api:prod
duber/trip.api and duber/invoice.api are the names of the images that we build locally, if you run docker ps or docker images commands, you can see them. vany0114 is my user on Docker registry and the thing after / is the repository which I want to store the image, and at the end, you can see the tag, in this case, is prod.
docker push vany0114/duber.trip.api:prod
docker push vany0114/duber.invoice.api:prod
Finally, we push the images to Docker Registry, you can see these images on my Doker profile.
Build and publish images process should be done in your CI and CD processes, and not manually like we’re doing it here.
Creating the Service Fabric Cluster
Now, we need a place where to deploy our Docker images, that’s why we’re going to create an Azure Service Fabric cluster, which is going to be our Microservices orchestrator. Service Fabric helps to abstract a lot of concerns about networking and infrastructure and you can create your cluster using the Azure portal if you prefer, but in this case, we’re going to create it using a script through the Azure CLI. Basically, this command creates a cluster based on Linux nodes, more specifically, with five nodes.
create-resources.cmd servicefabric\LinuxContainers\servicefabricdeploy duber-rs-group
Besides of the cluster itself, it creates a Load Balancer, a Public IP, a Virtual Network, etc. all these pieces work together and they’re managed by Service Fabric Cluster.
Deploying microservices on Service Fabric Cluster
After we have a Service Fabric cluster working on Azure, is pretty easy to deploy our images, we only need a Service Fabric container application project, and that’s it.
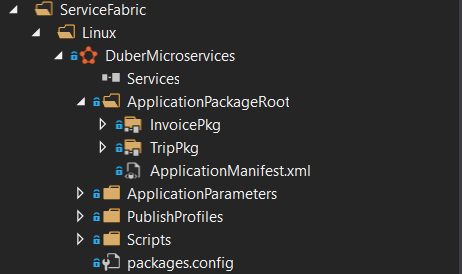
As you can see on the image, we have two Service Fabric Services, Invoice and Trip, let’s take a look at the ServiceManifest.xml which is the most important file.
<?xml version="1.0" encoding="utf-8"?>
<ServiceManifest Name="TripPkg">
  <ServiceTypes>
    <!-- This is the name of your ServiceType.
         The UseImplicitHost attribute indicates this is a guest service. -->
    <StatelessServiceType ServiceTypeName="TripType" UseImplicitHost="true" />
  </ServiceTypes>
  <!-- Code package is your service executable. -->
  <CodePackage Name="Code" Version="1.0.0">
    <EntryPoint>
      <ContainerHost>
        <ImageName>vany0114/duber.trip.api:prod</ImageName>
      </ContainerHost>
    </EntryPoint>
    <!-- Pass environment variables to your container: -->
    <EnvironmentVariables>
      <EnvironmentVariable Name="ASPNETCORE_ENVIRONMENT" Value="Production"/>
      <EnvironmentVariable Name="ASPNETCORE_URLS" Value="http://0.0.0.0:80"/>
      <EnvironmentVariable Name="EventStoreConfiguration__ConnectionString" Value="Your connection string"/>
      <EnvironmentVariable Name="EventBusConnection" Value="Your connection string"/>
      <EnvironmentVariable Name="AzureServiceBusEnabled" Value="True"/>
    </EnvironmentVariables>
  </CodePackage>
  <Resources>
    <Endpoints>
      <Endpoint Name="TripTypeEndpoint" Port="5103" UriScheme="http" />
    </Endpoints>
  </Resources>
</ServiceManifest>
So, as you can see, the entry point is our Docker image, so, we need to specify the user, repository and the label so Service Fabric downloads the image from Docker Registry, also if you need to override some environment variable, you can do it, specifying the name and the value in the EnvironmentVariables section. Last but not least, the Endpoint, you need to specify the port, which is the one that we talked about earlier, when we were speaking about TRIP_SERVICE_BASE_URL environment variable. So, in the end, this port is your access door to your service, where the house is the Service Fabric cluster.
There are a couple of files that we need to talk about, ApplicationParameters/Cloud.xml and PublishProfiles/Cloud.xml, the first one is used to pass the number of instances per microservice and in the second one, we need to configure the connection endpoint of our service fabric cluster.
This is the ApplicationParameters/Cloud.xml and this configuration means that we’re going to have five Invoice microservices instances and five Trip microservices instances.
<?xml version="1.0" encoding="utf-8"?>
<Application Name="fabric:/DuberMicroservices">
  <Parameters>
    <Parameter Name="Invoice_InstanceCount" Value="5" />
    <Parameter Name="Trip_InstanceCount" Value="5" />
  </Parameters>
</Application>
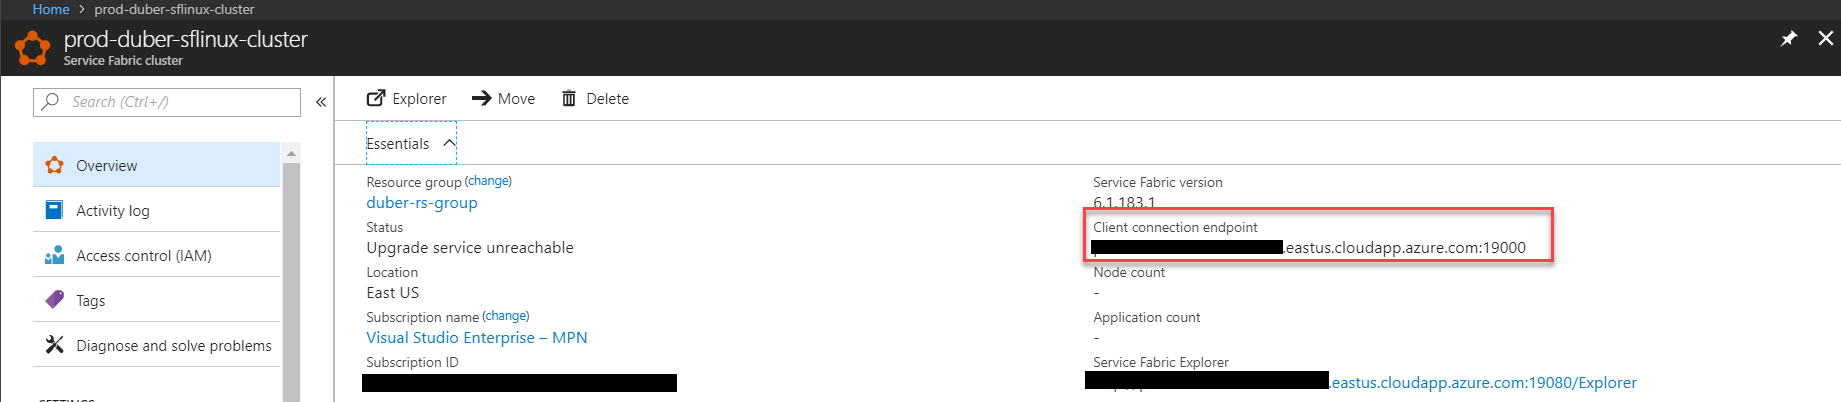
This is the PublishProfiles/Cloud.xml, you need to configure the connection endpoint, you can find it in the cluster information on the Azure portal as you can see in the next image.
<?xml version="1.0" encoding="utf-8"?>
<PublishProfile xmlns="http://schemas.microsoft.com/2015/05/fabrictools">
  <ClusterConnectionParameters ConnectionEndpoint="yourclustrendpoint" />
</PublishProfile>
So, after we complete that configuration, we only have to publish DuberMicroservices project, and that’s it, our docker images are going to be deployed in every node in the cluster.
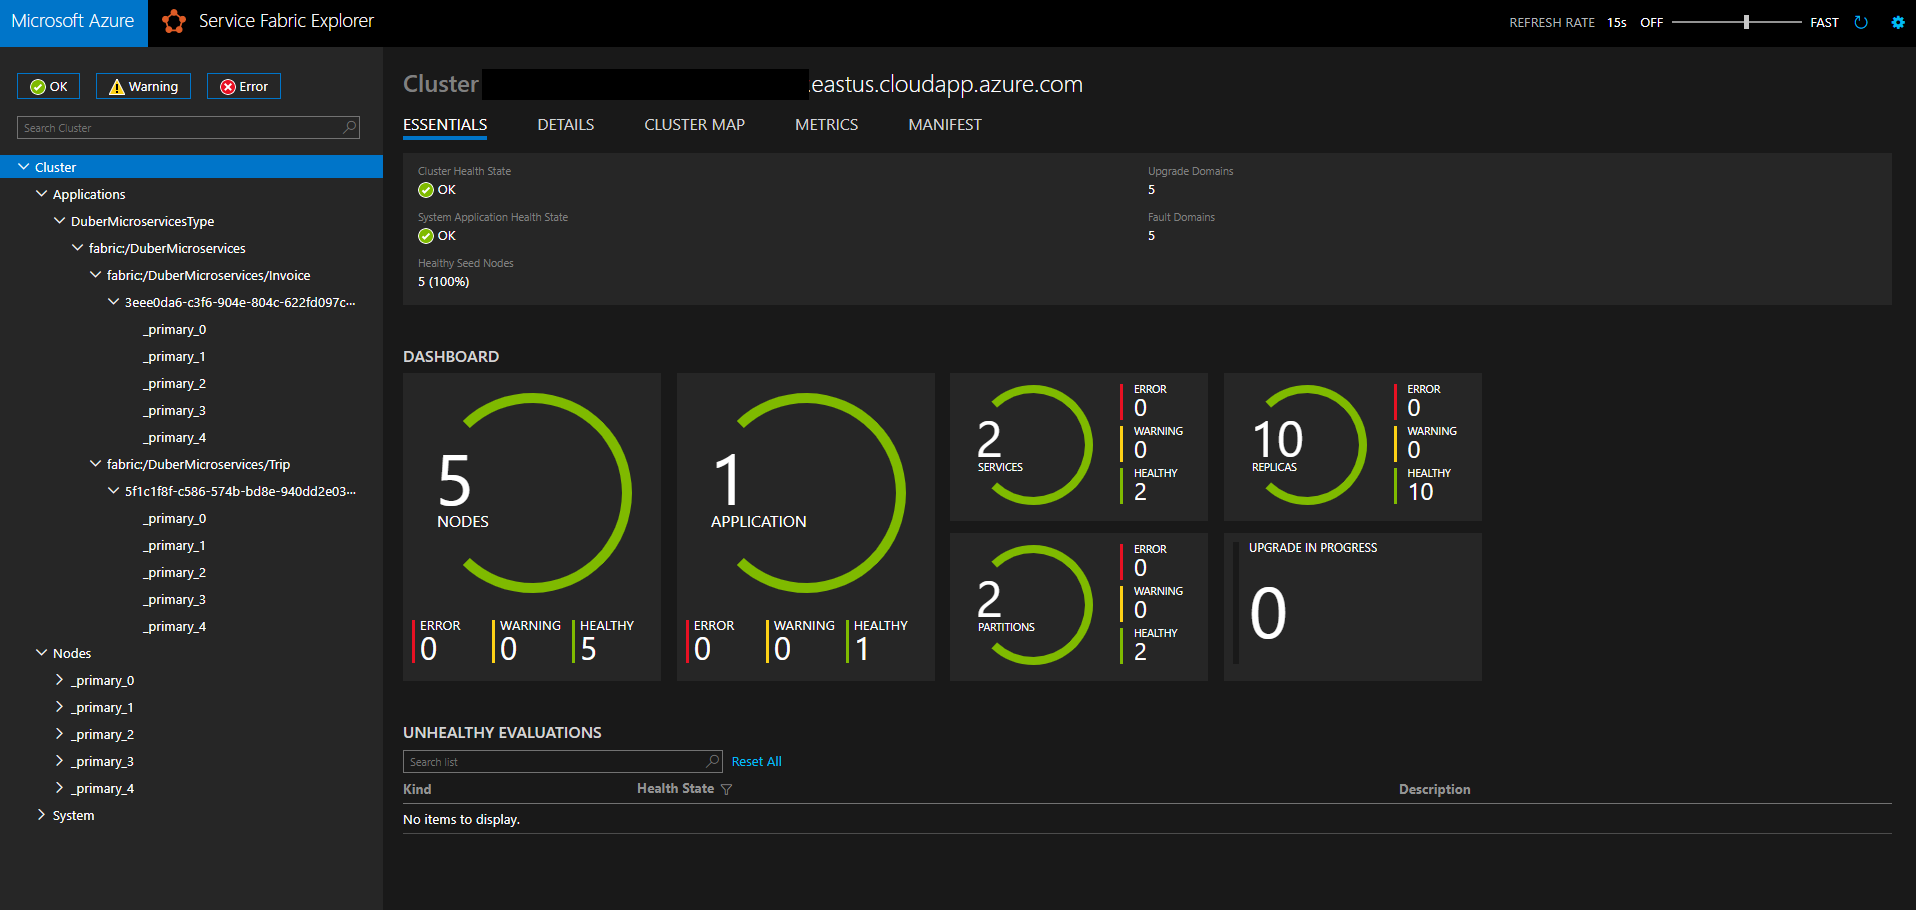
This is how the cluster looks like with our microservices, that’s a very cool dashboard where we can monitor our cluster, nodes and microservices.
Stats from Microservices vs Monolithic application
In order to do some tests and compare data between Microservices and Monolithic based applications, I deployed the WebSite, Trip and Invoice APIs as a monolithic application, where the website consumes directly the Trip API which is deployed as an Azure Web Site with just one instance. (obviously they are exactly the same applications that we deployed on Service Fabric) The first test is pretty simple, but it’s going to give us the initial idea about how the application based on microservices is, at least, faster than the monolithic one, let’s take a look at that.
Simple test
In this first test, I merely created the same Trip twice, one using the monolithic application and another one using the microservices one.

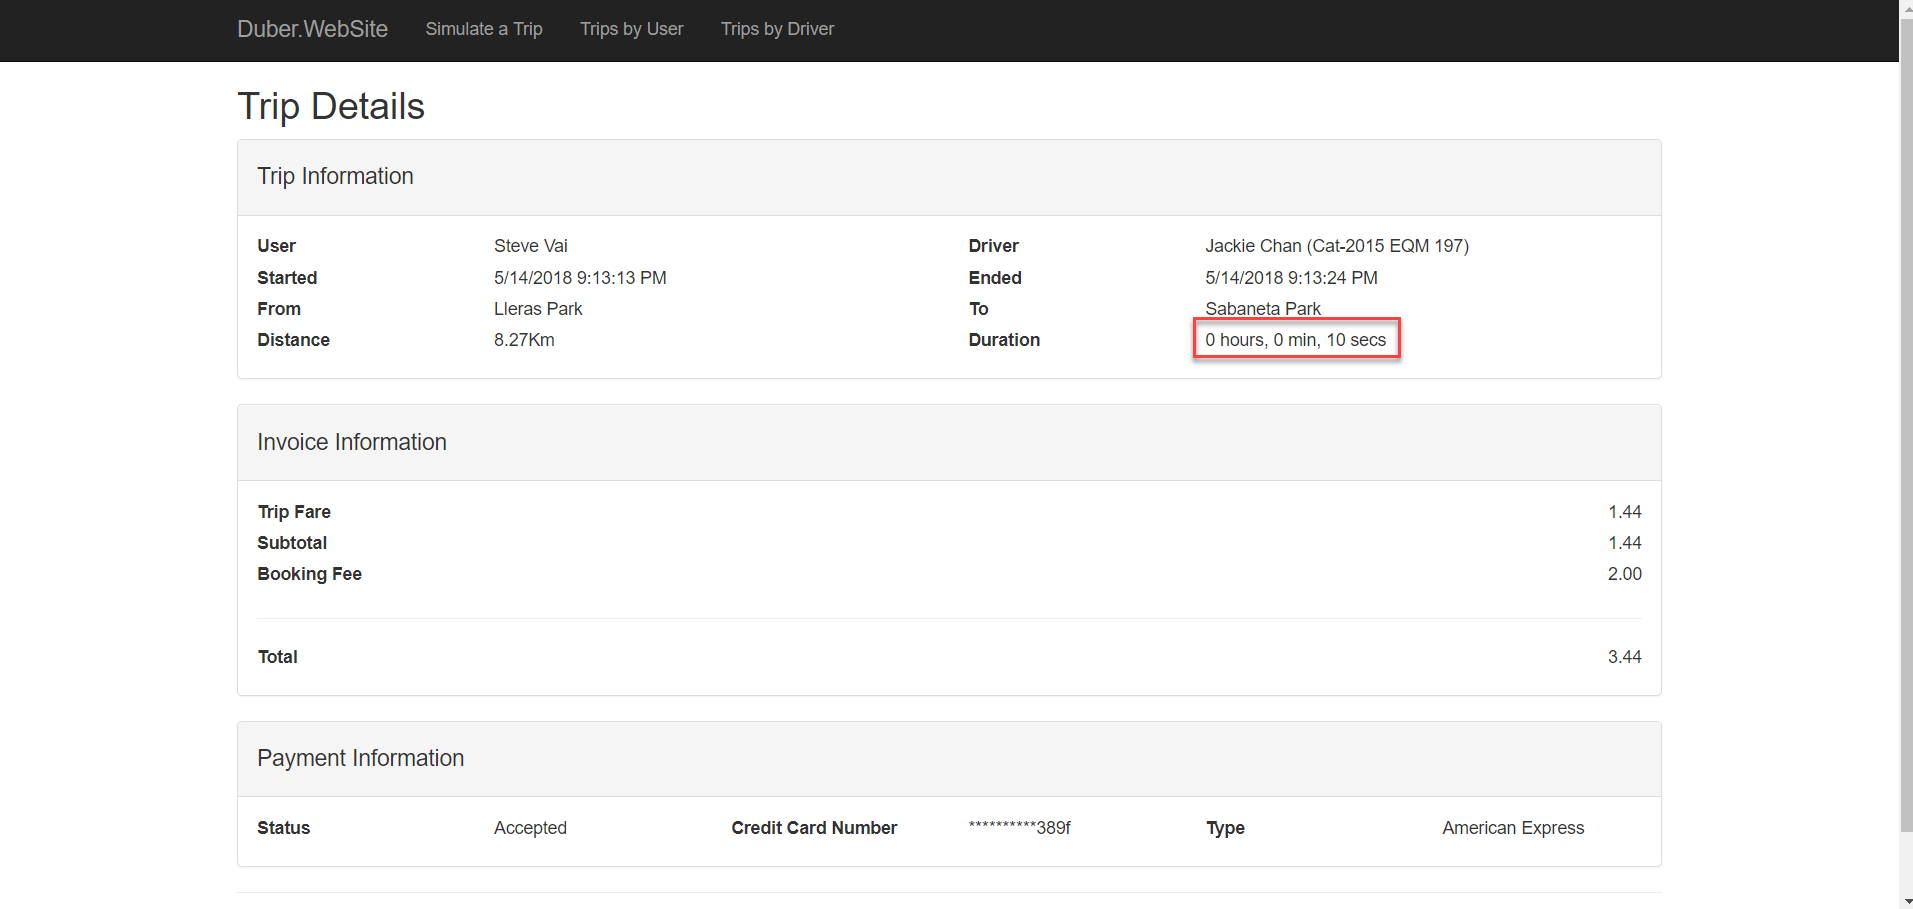
As you can see, at first sight, the results are obvious, the microservices based application is 2 times faster than the monolithic one, the second one took 22 seconds while the first one only took 10 seconds. You can see that the distance is the same, the only difference is the driver…or maybe Jackie Chan drives faster than Robert De Niro, could be a possibility ![]()
Load test
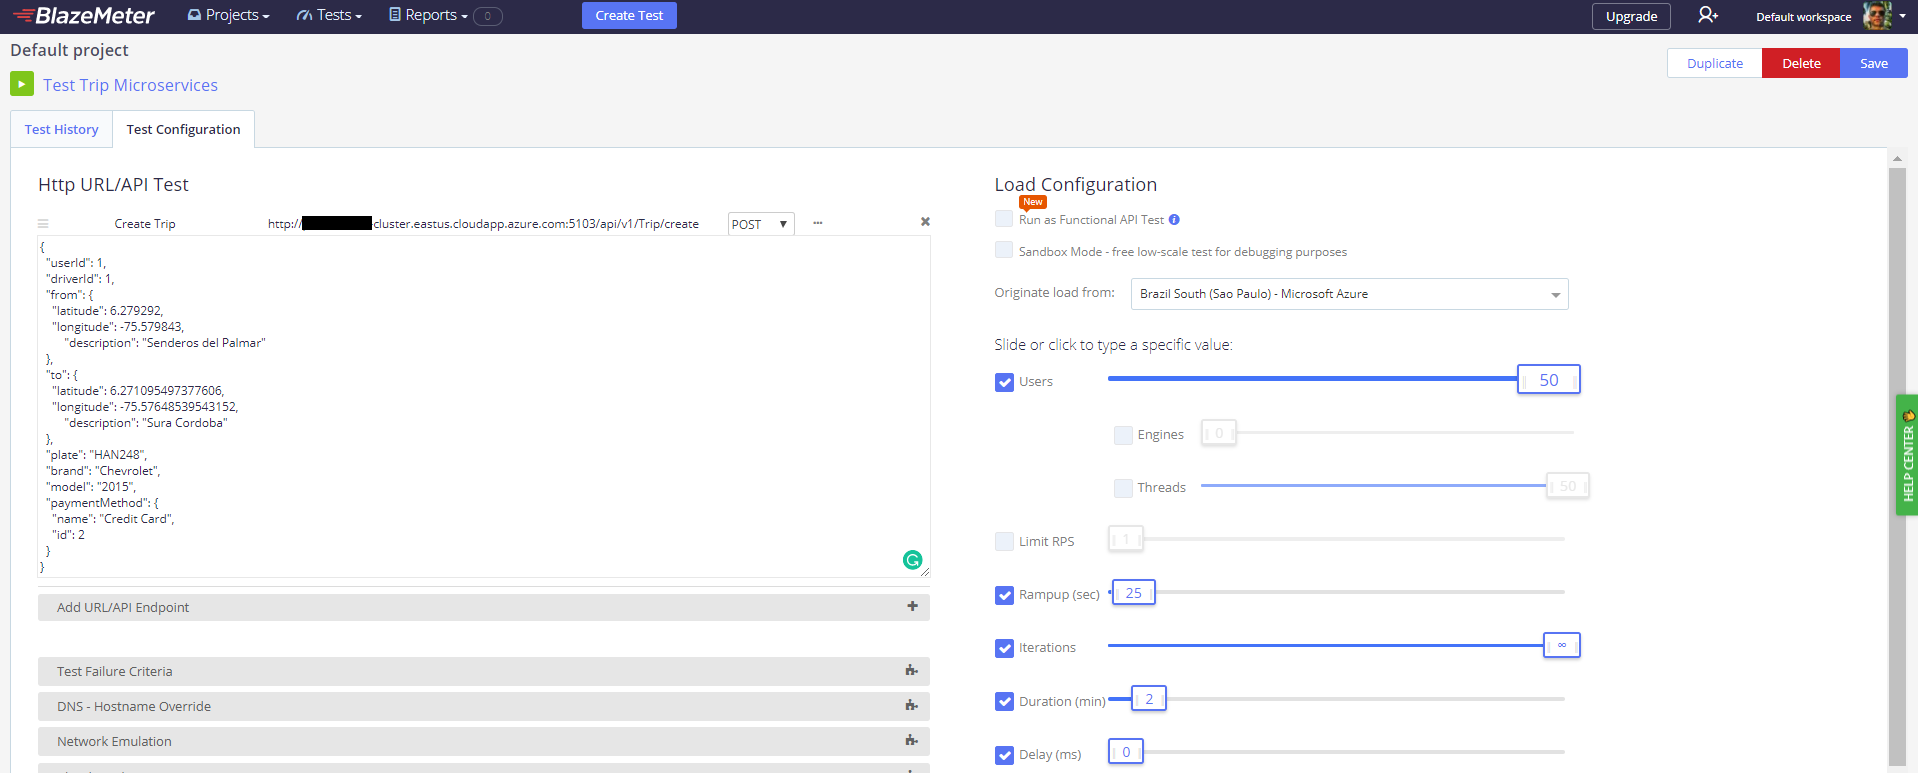
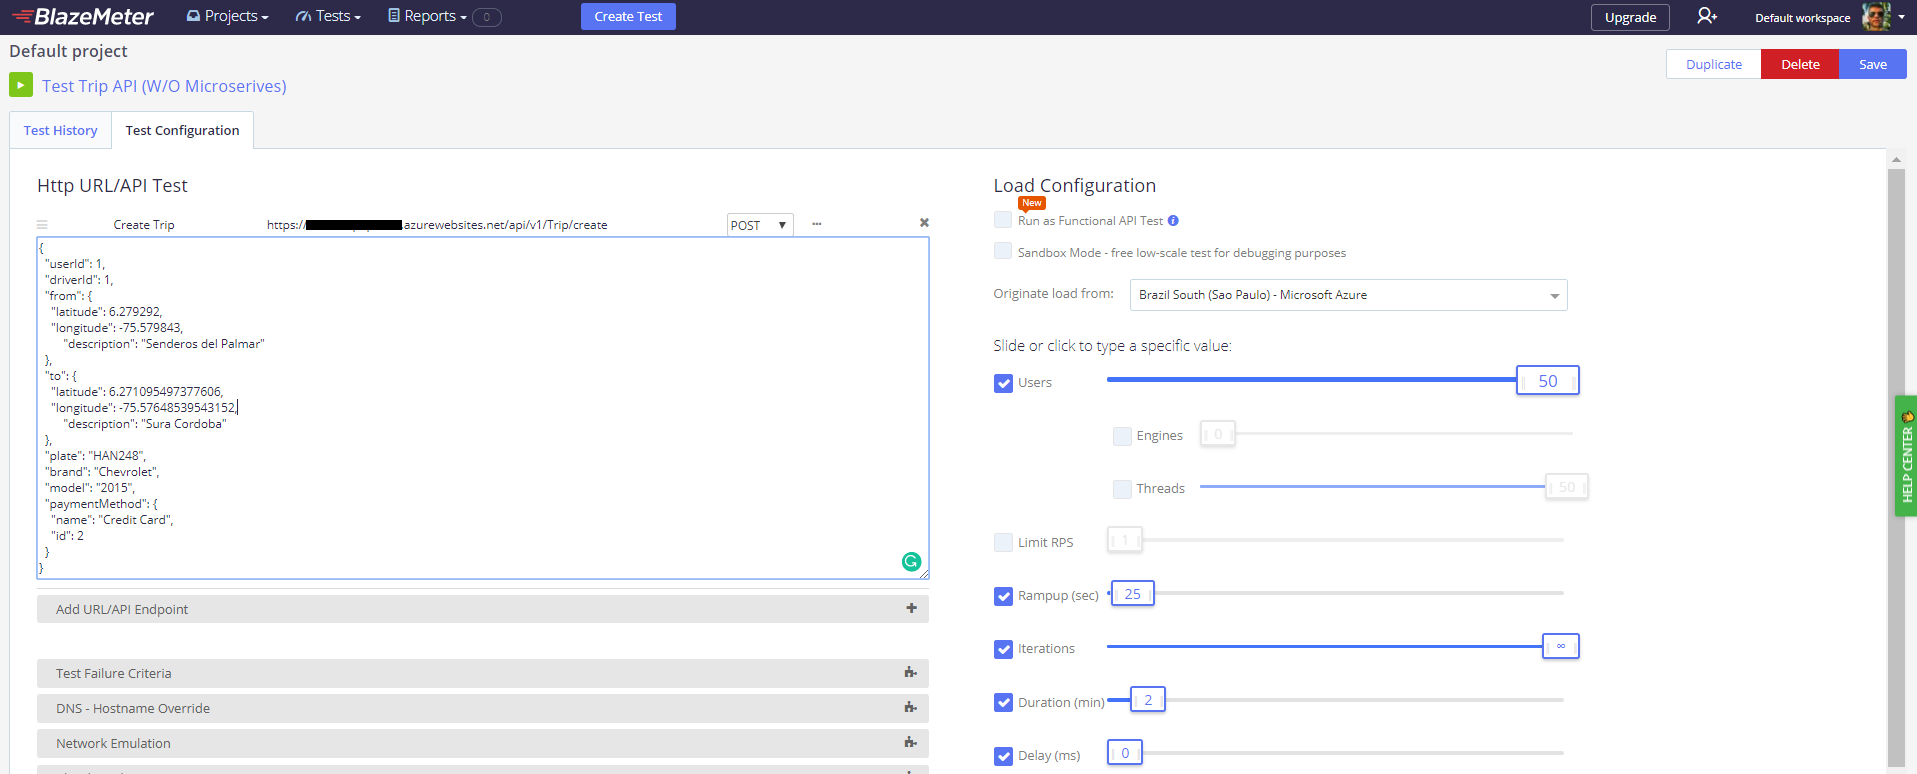
But, let’s do further tests to our microservices, I made a load test with the same parameters in order to test the Trip API. I used Blazemeter to do that, which is a pretty cool application to do that kind of stuff, by the way. So, the test emulates 50 users creating a trip concurrently during 2 minutes, these are the configurations:
Now, let’s take a look at the most important thing, the results.
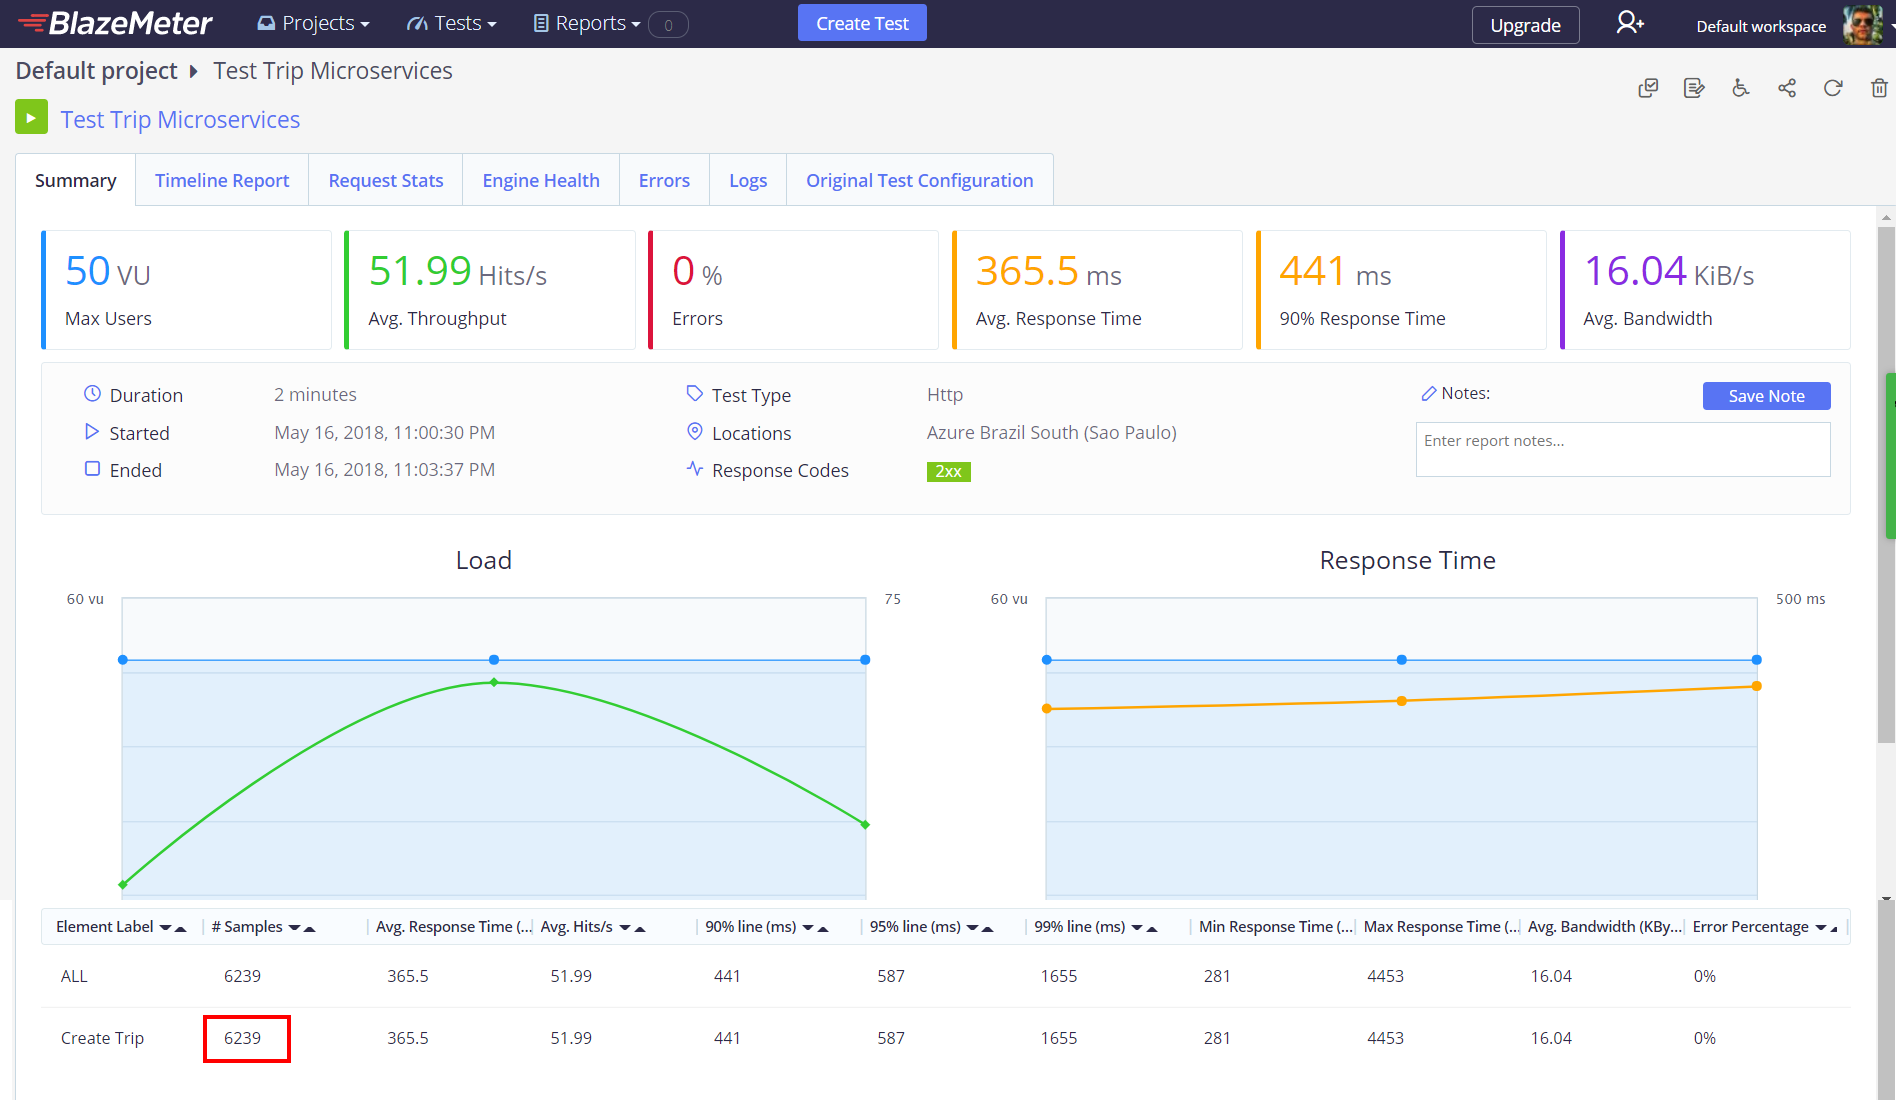
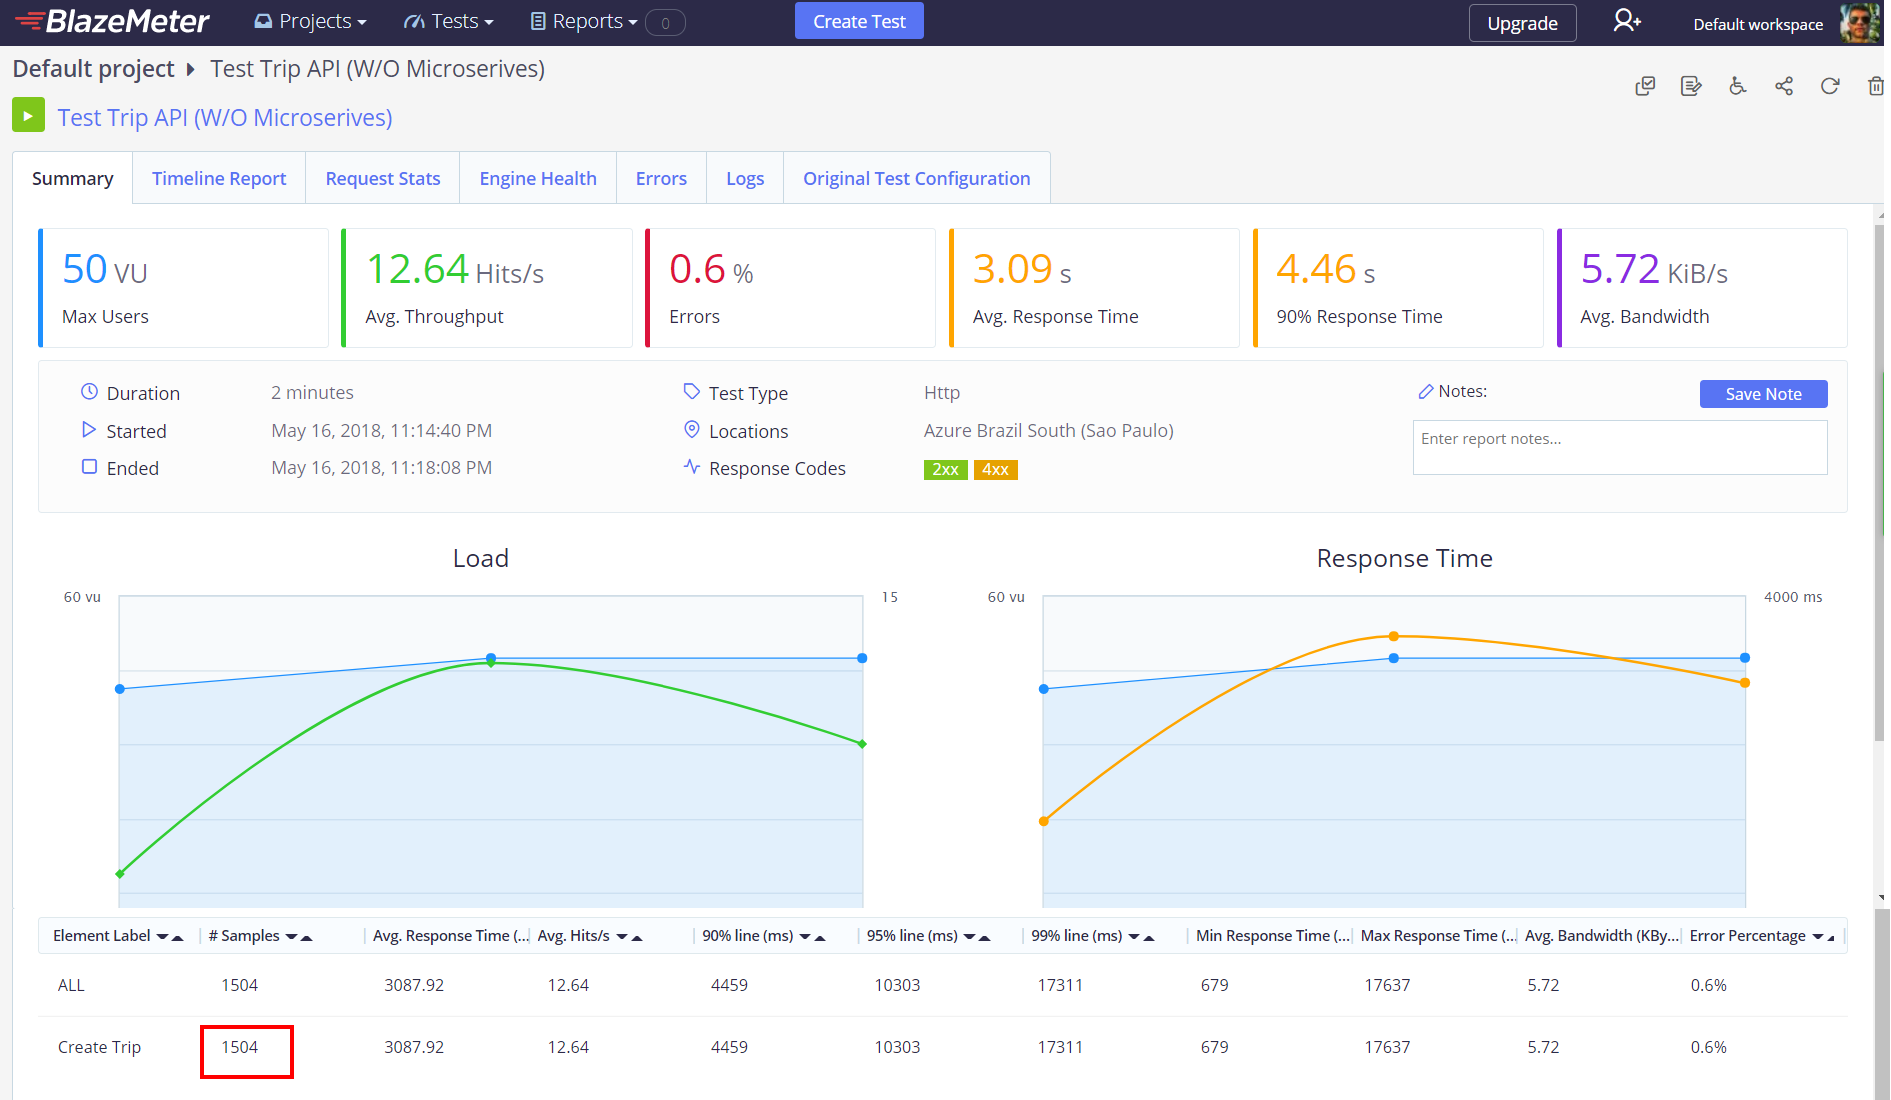
After seeing these results, I think they speak by themselves, the microservices based application is much better than the monolithic one, for example in that time, keeping 50 users creating trips concurrently the microservices based application was able to process 52 requests per second per user, for a total of 6239 requests, while the monolithic one, was just able to process 13 request per second per user, for a total of 1504 requests, so the microservices one, was 314.83 % more efficient than the monolithic one, improving its capacity to process requests per second, that was awesome!
So, speaking about response time, the microservices based application is 8.45 times faster than the monolithic one, the average response time for the first one is just 365.5 ms while the second one is 3.09 secs, impressive!
Last but not least, you can see that the microservices based application processed all the requests correctly while the monolithic one had 0.6% of errors.
Conclusion
We have seen the challenges of coding microservices based applications, the concerns about infrastructure and the complexity to communicate all microservices to each other, but we have seen how worthwhile microservices are and the great advantages that they can give us in our applications, such as high performance, high availability, reliability, scalability, and so on, which means, the effort of a microservice architecture, in the end it’s worth it, so, this was a basic example, but despite that we could see a tremendous difference between monolithic and microservices based applications in action. There are more challenges, like Continuous Integration, Continuous Delivery, security, monitoring…but that’s another story. I hope you enjoyed as much as me in these post series about such interesting topics and I expect it will help you. Also, I encourage you to improve this solution adding an API Gateway or a Service Mesh or whatever you think will be better. In the meantime, stay tuned to my blog. ![]()
![]()
References
These are the main references which I inspired from and learned about the topics that we talked about in these series of posts:
- Domain-Driven Design: Tackling Complexity in the Heart of Software - Eric Evans
- CQRS Journey - Microsoft
- Patterns of Enterprise Application Architecture - Martin Fowler
- Microservices Patterns - Chris Richardson
- Microservices & Docker - Microsoft